I am here to show you a Christmas Mini Album created with beautiful products from the Mirtillamente Craft Shop! All the links will be found below my project. I have LOTS of photos to share with you. Here is a look at my finished album cover:
Here is how I made it:
I began by deciding on my size. If you look at the finished cover, I was inspired by the "Merry Christmas" banner. To take advantage of it, I chose to make my album 8" wide by 6" tall. I also wanted to have chipboard covers; front and back. I cut all my pieces 8"x 6" - 2 chipboard pieces, and 9 decorative papers. You can look ahead to my finished album to see how I cut the paper for the base pages. These papers are covered with gorgeous designs, and I took full advantage of them!
I wanted to bring special attention to the banner on the front cover. I first covered the chipboard with a layer of teal colored cardstock that was slightly smaller than the chipboard. It matched the darkest teal in the design on the patterned paper. Then using a very sharp blade, I cut the bottom points of the pennants on the banner. You can see in the photo below, where I place a skewer underneath them.
Before adhering the decorative paper onto the teal cardstock, I placed foam pop dots to the back of each pennant of the banner. I added adhesive to the rest of the page, peeled off the backing of the pop dots, and adhered the decorative paper in place, on top of the teal cardstock.
The teal cardstock peeks out just a little bit.
Now the banner stands out beautifully, making it a real focal point of the front cover!
I went on to cover the other side of the chipboard with paper. I did the same with the back cover.
I thin inked all the edges of all the pages. Finally, I bound the album together with my Bind-It-All,
using 1" white O-wires. Now all that's left is the embellishing!
To finish off my front cover, I added part of a doily along the bottom center. I then fussy cut a large poinsettia from one of the pages, and added most of it using foam tape. Finally, I added some Prima crystals and a little ribbon bow to the top.
The red page is the back of the front cover. I added a white doily. On top of that I added a jounal card, and a little ribbon bow. The ride side page is just the beautiful paper.
The left side is the same, with the doily and the journal card with the bow. Between the pages I added a pocket, created from an extra strip of paper. To the pocket I added two white tags.
To the back of the pocket I added one of the photo frame journal cards. The right side is more beautiful paper.
Here I have added a doily again, and turned the photo frame journal spot sideways. Between the pages I have added an extra under-cut strip of paper. I decorated it with some fussy cut elements.
More of the gorgeous decorative paper.
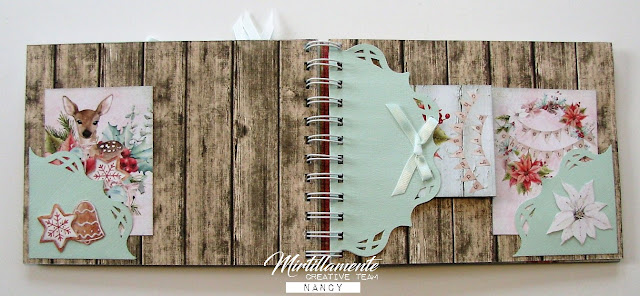
To this spread I added two corner pockets. These are decorated with more fussy cut elements. A lovely journal card is tucked into each one.
A matching doily is folded in half to form a pocket, and inserted between the two pages. This doily pocket is decorated with ribbon bows, and holds two more journal cards.
Here's another lovely spread, with an under-cut page insert.
To the back side of it I added this sweet little die-cut mini envelope with a letter that reads "God Jul"!
Isn't that adorable? I love it so much I wanted to add it to every page! lol
On the bottom right corner I added several fussy cut elements.
Another pretty spread, consisting of corner pockets, journaling spots, and a pretty doily with ribbon bows.
Here I added some pretty shimmer ribbon across the corner, and a fun tag pocket.
I added a pretty bow, and a little gingerbread house to keep the tab closed.
This pocket holds another white tag with ribbon. The right side is the inside of the back cover. It has another white doily with a journal card on top.
Finally, here is the back cover. So frosty and pretty in pink!
Here are links to all the products I used from Mirtillamente Craft Shop:
Prima Marketing enamel shapes - Amber Moon
Mintay by Karola Witczak - Christmas Stories


Nessun commento:
Posta un commento